Tech Monodip

Pages

Friday, April 26, 2019

GENERAL KNOWLEDGE ABOUT HARDNESS TESTING METHODS

GENERAL  KNOWLEDGE  ABOUT

HARDNESS TESTING METHODS


Heat treating has evolved into a highly complex, precise process that improves characteristics of metal parts. A critical component of quality heat treating is employing the correct hardness testing method to show manufacturers their parts achieve design requirements.
Hardness testing methods vary based on the material and heat treatment chosen. It’s important that engineers specify hardness testing methods correctly to ensure timely heat treatment and avoid costly delays.
Common hardness testing methods are introduced below.

Rockwell Hardness

This method tests the hardness of steel parts by applying loads to parts via either a tungsten carbide ball or a spheroconical diamond indenter. A part’s testing surface and seating surface must be properly prepared prior to testing. Inadequate surface preparation can lead to failed tests or false readings.
Following surface preparation, a light load is applied to the indenter (usually either 3 or 5 kgf) to zero out the testing machine. Then, a heavy load (anywhere from 15 kgf to 150 kgf, depending on the material and its strength) is applied and held for a period of time.
The downward distance the indenter traveled from the application of the light load to the release of the heavy load is recorded and used to calculate hardness.


Rockwell hardness is determined by measuring the distance traveled by an indenter 
when a heavy load is applied to a heat treated part.


Variants on the Rockwell hardness test procedure are used depending on the material and strength of a part. The most common Rockwell variants include:
  • HRC – Known as “Rockwell C,” a 150 kgf load is applied via a diamond in this method. It’s most commonly used on steels that are through hardened to increase strength. Parts commonly tested by this method include nuts and bolts, hand tools, seat belt buckles, chains, springs, axles, bearings and blades.
  • HR15N – This method is known as “Rockwell 15N.” A relatively light, 15 kgf load is applied to case hardened parts treated to achieve a minimum effective case depth 0.007 inches or a total case of 0.012 inches. Other Rockwell variants (HR30N and HR45N) apply slightly higher loads on parts with incrementally higher minimum effective or total cases.
  • HRBW – “Rockwell B” uses the tungsten carbide ball. It’s commonly used for “soft” parts like austenitic stainless steels and for annealed parts.

Brinell Hardness

Relatively high loads are applied to parts via a tungsten carbide ball in this method. Unlike with Rockwell testing, Brinell tests measure the diameter of the indentation made by the ball, not the depth. A 10mm ball with an applied load of 3,000 kgf is most common for Brinell testing.
Brinell tests are ideal for castings and forgings that may have rough surfaces or exhibit some chemical variation. Because the indentation ball is so much larger than in other testing methods, hardness values derived from the test provide a more representative average hardness of the part.


Microhardness testing

Microhardness tests apply considerably lighter loads compared to other methods. Precisely cut diamonds are used for these tests, which most often measure hardness in small, localized regions of parts. Microhardness tests are best used to determine case depths of case hardened parts.
Two types of diamonds are used in microhardness tests. Pyramid-shaped Vickers diamonds are usually used in Europe and Asia. Knoop diamonds, which are pyramidal but with two elongated legs, have historically been more common in the U.S.
It’s important to specify which microhardness testing method to conduct as conversions between the values produced by each type of diamond are only approximate.
It’s also critical to specify the correct load for Knoop tests because too-light loads could produce falsely high hardness readings. For Vickers tests, too-light loads create too-small indentations on a part, which leads to inaccurate hardness readings. On the flip side, too-heavy loads could punch all the way through a case, ruining the chance of getting an accurate hardness reading. Precise specs that include the appropriate testing method and hardness range limit potential error and ensure efficient heat treatment.


Ref : paulo.com , google images
Thursday, April 25, 2019

GENERAL KNOWLEDGE ABOUT UNIVERSAL TESTING MACHINE (UTM)

GENERAL  KNOWLEDGE  ABOUT

UNIVERSAL TESTING MACHINE  (UTM)


A Universal Testing Machine (UTM) is used to test both the tensile and compressive strength of materials. Universal Testing Machines are named as such because they can perform many different varieties of tests on an equally diverse range of materials, components, and structures. Most UTM models are modular, and can be adapted to fit the customer’s needs.
Universal Testing Machines can accommodate many kinds of materials, ranging from hard samples, such as metals and concrete, to flexible samples, such as rubber and textiles. This diversity makes the Universal Testing Machine equally applicable to virtually any manufacturing industry.
The UTM is a versatile and valuable piece of testing equipment that can evaluate materials properties such as tensile strength, elasticity, compression, yield strength, elastic and plastic deformation, bend compression, and strain hardening. Different models of Universal Testing Machines have different load capacities, some as low as 5kN and others as high as 2,000kN.
Tests can also be performed in controlled environmental conditions. This is achieved by placing the Universal Testing Machine into an environmental room or chamber. For example, metals testing can be conducted at extreme temperatures: from -196°C (-321°F) to over 1000°C (1800°F).

Qualitest offers the most competitive line of Universal Testing Machines (Universal Tensile Tester) in the industry. Our comprehensive range of Universal Testing Machines includes an extensive portfolio of grips/fixtures, load cells, extensometers, and many other accessories. Supported by excellent service and training, our QM-Series is positioned as a top contender in every application market for material testing. The QM-Series Universal Testing Machines range is designed for quick and reliable tensile, compression, flexural (bending), shear, peel, fatigue cycling, and constant load tests on metals, composites, alloys, rigid plastics and films, elastomers, textiles, paper, board and finished products.


Construction and working of UTM

  • The universal testing machine has two vertical threaded shafts.
  • where the movable crosshead will slide on these vertical Bars. The Crosshead will be constant.
  • These two heads will have locking clamps to hold the specimen in place. such as wires, rods, for mostly tensile test only.
  • If it is a tensile test then the specimen will be placed in between the Cross head and the movable head jaws.
  • If it is a compressive test The specimen will be placed in between the movable head and the table.
  • There is a speed controller, this controls the speed of the two vertical threaded shafts, as the result, there will be a change in the load applied to the specimen with the help of the movable crosshead.
  • With the help of the loading dial indicator, we can observe how much load is applied to the specimen during the test.
We can do both the Tensile test and the compressive test on this universal testing machine. Not only these tests there are some other tests such as the flex test.
Main Parts Of U.T.M
  1. Upper cross Head
  2. Movable cross Head
  3. Table
  4. Load Indicator
  5. Speed control
  6. Space for tensile specimen
  7. Space for Compressive Specimen


Test Application
Aerospace Testing
Automotive Testing
Cardboard & Paper Testing
Concrete Testing
Metal Testing
Packaging Testing
Plastic Testing
Rubber Testing
Textile Testing


Universal Testing Machine Construction Details (UTM) Video Clip


Ref : Wikipedia , extrudesign.com, worldoftest.com , google images , youtube

Wednesday, April 24, 2019

GENERAL KNOWLEDGE ABOUT MILLING MACHINE

GENERAL  KNOWLEDGE  ABOUT

MILLING  MACHINE


What is a milling machine?


Milling is the cutting operation that removes metal by feeding the work against a rotating, cutter having single or multiple cutting edges. Flat or curved surfaces of many shapes can be machined by milling with good finish and accuracy. A milling machine may also be used for drilling, making a circular profile and gear cutting by having suitable attachments.

Milling is the machining process of using rotary cutters to remove material from a workpiece by advancing (or feeding) in a direction at an angle with the axis of the tool. It covers a wide variety of different operations and machines, on scales from small individual parts to large, heavy-duty gang milling operations.

Milling machines are tools designed to machine metal, wood, and other solid materials. Often automated, milling machines can be positioned in either vertical or horizontal orientation to carve out materials based on a pre-existing design. These designs are often CAD directed, and many milling machines are CNC-operated, although manually and traditionally-automated milling devices are also common. Milling machines are capable of dynamic movement, both of the tool and the workpiece, and many milling machines can perform multi-axis machining.
Because of variations in orientation, operation and application, milling machines have varying functions and different operating principles.

Tooling
Milling machines can be outfitted with a number of tool heads to accomplish different machining needs. Some of these tool heads include cutters, rounding mills,fluted mills and ball end mills. Some milling machines have rotating tool ends that can change depending on the needed task—computer programming communicates with the machine when to change its tooling.
The different tooling used in milling machines is based on material and desired shape. Because materials like wood and steel have different physical properties, different tool bits are needed to properly machine the materials. If a milling machine uses a tool bit that is not strong enough to machine steel, the tooling and even the machine itself can be damaged. Tooling that is too strong for softer materials can damage the workpiece.
The basic tooling bit on a milling machine is called the cutter. A cutter is a shaped bar that has saw teeth. The cutter rotates rapidly to cut down and shape materials. The cutter is attached to an arbor, which is sometimes called a mandrel or mandril, a shaped bar that varies in size, length and ending, and is used to hold the cutter firmly.
A milling cutter’s saw ending can be spaced, sized and oriented in many ways. Generally, the teeth are either positioned in a straight up-and-down orientation, or angled in a helical orientation. Straight teeth are preferable in operations on denser materials, while helical teeth can create very smooth cuts on softer materials. There are a variety of cutters within these categories, including dense end cutters, t-slot cutters, and angle cutters. Cutters are subject to different standardized sizes, with CAT sizes as the most commonly-used standardization category in the United States.

Types of Milling Machines
Milling machines are categorized by their orientation to their workpiece and their degree of motion.
Knee-Type
Knee-Type milling machinesemploy a vertical workspace supported by a knee, which is an adjustable vertical casting. The knee supports a saddle and can be adjusted to allow for a customizable workspace.
Plain Vertical and Horizontal
Milling machines with a standard work surface can either be oriented vertically or horizontally. The tooling assembly is generally affixed on a turret and swivel, typically positioned parallel to the workspace. The turret and swivel allow the tool to move freely around the workpiece to enforce tight tolerances.
Universal Horizontal Milling Machine
A universal horizontal milling machine differs from the plain horizontal type because it has a table swivel housing, which allows the table to move out 45 degrees from the standard horizontal position. This workpiece movement allows for easier angular or helical milling operations.
Ram-Type and Universal Ram-Type Milling Machines
A ram-type machine is used to allow the tooling to position itself on a greater range of space with regards to the workpiece. The ram-type machine has a spindle on a movable housing, which can move within a set horizontal plane. The universal ram-type milling machine includes a swivel housing that increases the range of cutting movements.
Swivel Cutter Head Ram-Type Milling Machine
With a swivel cutter, a milling machine can rotate from a completely vertical to a completely horizontal position. The worktable also moves, providing the user with a very liberal degree of motion and orientation. Many swivel cutters include both automatic or hand driven settings, increasing operation options.

Construction Details Of Horizontal Milling Machine Video Clip


Ref: Quora.com , google images , youtube

Tuesday, April 23, 2019

GENERAL KNOWLEDGE ABOUT LATHE MACHINE

GENERAL  KNOWLEDGE  ABOUT

LATHE  MACHINE


What is a lathe machine?

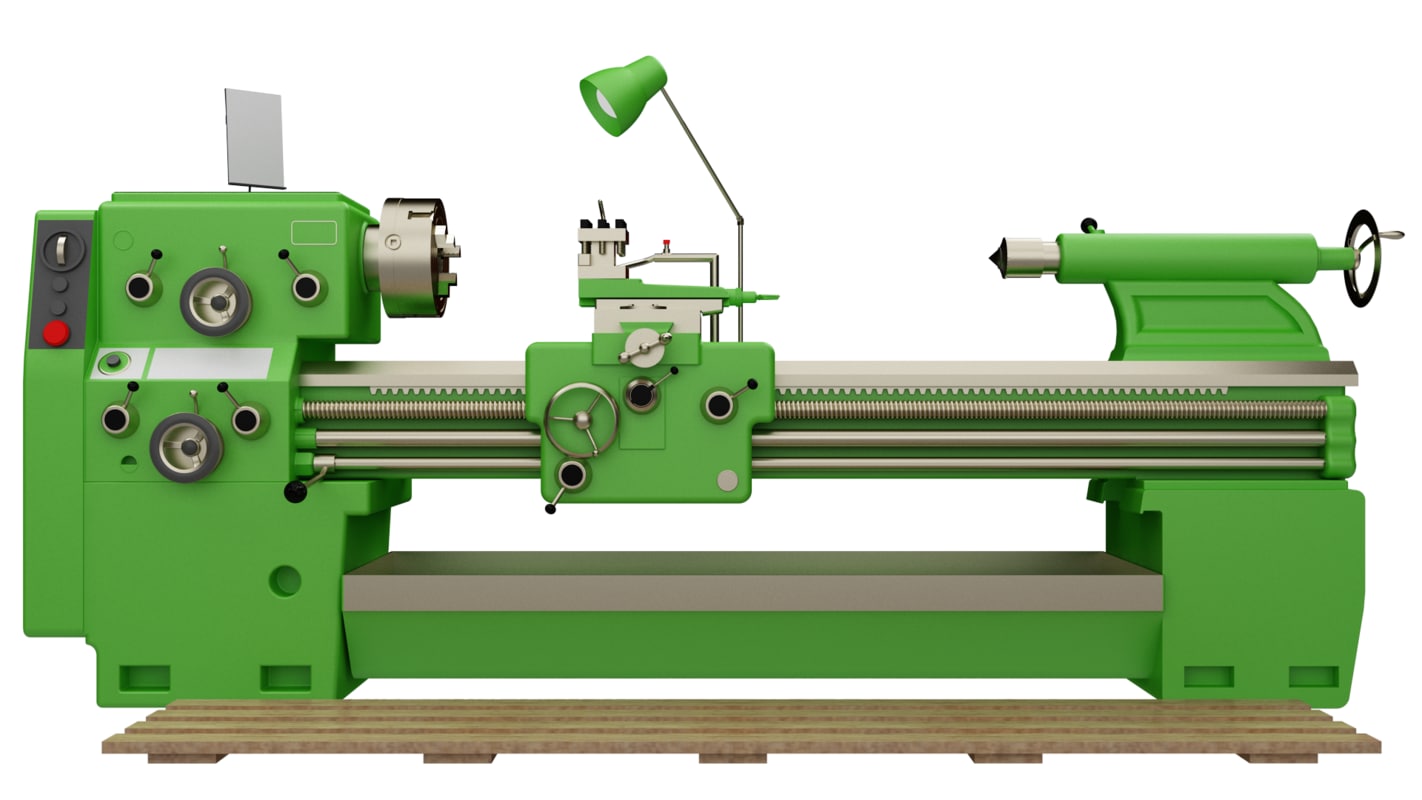
Ans : A lath Machine is used for cutting, drilling, knurling and other related machine operations. Lath is one of the old machines that are used for cutting and knurling operations. This machine has the property of producing a three-dimensional surface.
Lath machine is used in almost every part of the world and every industry. It is one of the oldest known machines that we can use for the cutting and knurling operations.

Parts of Lathe Machine

The 22 parts of lathe machine are as follows.
  1. bed
  2. Leadscrew
  3. Guideways
  4. Prime Mover
  5. Transmission System
  6. Headstock
  7. Spindle
  8. Chuck
  9. Feed Gearbox
  10. Thread Chasing Dial
  11. Split Nut
  12. Carriage
  13. Slideways with Saddle
  14. Compound Rest
  15. Tool Post
  16. Tailstock
  17. Quill
  18. Faceplate
  19. Catchplate
  20. mandrel
  21. Steadyrest
  22. Follower Rest


11 Lathe Operations You Must Know:

The different types of lathe operations performed on a lathe machine are as follows:
  1. Turning
  2. Facing
  3. Thread Cutting
  4. Honing
  5. Drilling
  6. Boring
  7. Counterboring
  8. Countersinking
  9. Trepanning
  10. Reaming
  11. Spot Facing


Construction Details Of Lathe Machine Video Clip


                                                                                                                                                                                       Ref: Quora.com ,google images , youtube